Okay everybody, I know it’s been quite a while since we have done the Mystery Recipe Monday thing… but I really feel like we should get back into the habit once again. All of you really seem to enjoy it when I post recipes, as we get lots of visitors and regulars who stop by to see what the “good lookin’ Modern Pioneers have got cookin’!” Many of you will remember parts of that line from a Hank Williams Sr. song entitled “Hey, Good Lookin’, Whatcha Got Cookin’!”
Today we have something really good lookin’ a-cookin’ in the Modern Pioneer Kitchen. (Oh, and it’s also really good tastin’ too!) I (Modern Ma) am so delighted with my newly remodeled kitchen that I have been itching to get in there and really put this beautifully functional and just plain beautiful work-space to hard work. We finished this huge home improvement project (stay tuned for several upcoming DIY posts about remodeling a farmhouse kitchen on a budget), just in time… for a monumental heat wave… OF COURSE! So the past couple weeks have been mostly salads and foods that can be cooked via microwave, such as turkey enchiladas made with ground turkey I had pre- cooked and frozen for later use and Spanish rice made with leftover rice I had also frozen as an easy prepare staple for hot or busy evenings. Due to the heat-wave, Pioneer Pa and I decided to put off having an anniversary cake until the weather cooled (our wedding anniversary being June 29th and being as this one is #10, I felt like I ought to do a special dessert.)
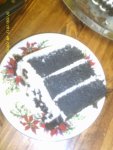
Having seen a variation of Red Velvet Cake done in blue by the Betty Crocker test kitchen , I decided try my hand at a beautifully decorated Gluten Free version of my own variation a Black Velvet Cake (okay I was actually aiming for a Royal Purple Velvet, Pa’s favorite color being purple… but alas I was completely out of both red and purple food coloring… trying to use up much of my old Wilton gel food coloring before the kiddos return home)… so I did it with black food coloring which I had a lot of (if you think red and yellow food coloring makes little boys hyper-active, try giving them black food coloring! Grab a putty knife and prepare to scrape those boys off your ceiling!). Yes, Black Velvet Cake, sounds very “Elvis Presley”, but it should be very beautiful and dramatic (is anything quite so elegant as a black and white cake in the world of desserts?)… quite suitable for a 10th Wedding Anniversary. Especially considering that we had a Christmas In June Wedding, which was also quite stunning and dramatic in it’s own right.
So, now for our Mystery Recipe Monday recipes.

Black Velvet Anniversary Cake
(A Special Gluten-Free Dessert for Special Occasions )
*WARNING– This cake is NOT FD&C DYE FREE and NOT DAIRY FREE
2 pkg. Betty Crocker Gluten-Free yellow cake mix
6 large eggs
2/3 cup. canola oil
1 TBSP Cocoa Powder, leveled
1 cup plain soy or almond milk
1 tsp. cider vinegar
1/2 cup water
1/2 of a large jar of Wilton Gel Food Coloring (Black)
Prepare cake mix, as per manufacturer’s directions, adding the cocoa powder into the cake mix before adding the wet ingredients. Substitute the soy/almond milk, vinegar and 1/2 cup water for the water called for on the box. Mix in food coloring
Grease four 8 inch or three 9 inch round cake pans and divide the batter equally among the pans. Space them equally in the oven on both racks and bake at 350 F for 30 to 40 minutes or until a toothpick test comes out clean. Remove from oven and cool in the pans on a cooking rack until about room temp. If your cakes mound up in the center, you can level them once they are removed from the pans with a serrated bread knife.
Place bottom layer on a cardboard circle or a cake plate/cake stand. Fill with cream cheese icing or another favorite filling (such as raspberry or blackberry jam, or both jam and cream cheese icing together would be lovely, 2 layers of filling). Place next layer on top of bottom layer, leveled-side down, and once again fill between layers with icing or favorite filling. Repeat for 3rd and 4th layers.
To seal in crumbs, thinly frost cake w/ room temp. cream cheese icing, starting at the top center and working out toward the top edge and then down the sides with a large angled (off-set) metal spatula. TIP: If you have a rotating cake stand or a lazy-susan from your spice cabinet, place your cake plate/round on it and use this to smoothly turn the cake as you frost it… this makes the job a little faster and easier and usually results in a more professional looking cake.
Once cake is crumb-coated, place in the fridge for about 2 hours to set the icing. Remove from fridge and frost cake again so that cake does not show through the icing. Return to fridge for about 2 hours to set again. At this point,you can either serve it as is or decorate it with contrasting tinted icing using a piping bag and decorating tips for a special occasion such as a birthday anniversary or even small wedding or wedding shower. Once again, allow a couple hours in the fridge for icing to set, especially in the summertime, it will solidify the shortening/cheese mixture that is the basis of your icing and prevent all your hard work from sliding down the side of your cake.
Cream Cheese Decorator Icing
(Note: if you have a stand mixer, definitely use it for making decorating icing, as this type of icing is quite thick.)
8 oz pkg. cream cheese, room temperature
3/4 cup vegetable shortening
3 lbs powdered sugar (approx. as moisture levels in this product can vary, adjust as needed)
2 tsp. double-strength vanilla extract
1 to 2 tsp. rum flavoring
1 tsp. raspberry flavoring
2 to 3 TBSP Almond or Soy milk
Using an electric mixer (stand type if you have one), cream together the cream cheese and shortening. Slowly add in sugar1/2 cup at a time, beating well between additions. After adding 1/2 of the sugar, add in the flavoring extracts and 1 TBSP of milk. Mix well. Add more sugar, a little at a time, until most of it is in the icing. Add another TBSP of milk then finish adding the sugar. Adjust thickness of icing by adding more sugar or milk as needed for a spreading consistency to ice the cake with. To make stiffer icing for piping decorative designs and borders onto cake, thicken with more powdered sugar.
To make black decorator’s icing (that doesn’t taste like ink), darken your icing with baking cocoa (powder)… this will also thicken consistency slightly, then begin adding black gel food coloring until desired color is reached mixing color in between additions (let stand 5 to 10 minutes when color is a shade lighter than you think you want, as they sometimes darken a little in a buttercream/cream cheese style icing with time. You can always add more color, but you can’t take it away… you can add more “white” icing, but you may end up with far more than you need.)
You can find Wilton Cake Decorating supplies at many local discount or craft stores (such as Walmart, Ben Franklin Crafts or Hobby Lobby) or at http://www.wilton.com .
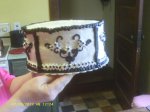
To decorate the cake above:
1. Using black icing in a disposable decorating bag fitted with a coupler and a #2 round tip to pipe a pretty scroll design on the sides of the cake, which I repeated 5 times around the side of the cake. (I used a tool I’ve had for years called a pattern press to mark my scroll-work, this product is no longer available unless you get lucky finding one in a thrift shop, but you can find a design or clip-art you like, print it out and trace it onto waxed paper and then use the wax paper to position the design and mark the design onto the cake using a toothpick to prick the wax paper and leave marking on your cake icing.)
2. Using Tip #107 and white icing in another disposable decorating bag fitted with a coupler, pipe drop flowers onto the scrolling vines.
3. Using the black icing and #2 tip again, pipe dots into centers of flowers.
4. Using a #10 tip and white icing pipe a line of white icing around the base of the cake at the plate.
5. Changing black icing bag to a #97 ruffle tip or a #104 rose tip, fat end up, pipe a ruffled border at the base of the cake on top of the line of white icing (this will help it flare out like a ruffle), wiggling up and down slightly as you pipe around the cake.
6. Changing black icing bag to a #10 round or a # 32 star tip, pipe a ball border or a shell border on the top edge of the cake.
* Refill our decorating bags with icing as needed as you go, leaving enough room to twist the bag closed at the top so icing does not squish out the top and make a huge mess.
For more complete instructions on these decorating techniques, please check out the Wilton link above or consider purchasing a very basic starter kit from Wilton locally.
You might even be able to find cake decorating class locally that you can take (possibly with your spouse if he’s interested, or with one of your kids… most 7 or 8 year-olds are plenty old enough to learn cake decorating with parental supervision.) My mother took the first two courses in a local Wilton Decorating class and taught me at the age of 5 while she was practicing at home. As a teen, I self-studied the more advanced classes.
For Pioneering Families in this Modern Era, the basics of cake decorating are a terrific skills to consider learning. Not only is is a great, fun-filled family activity, it can also be a frugal, money-saving skill compared to the rapidly increasing costs of having a cake professionally decorated by a bakery… particularly when you are at a stage where weddings, anniversaries, baby showers etc. are frequently in order.